


The following has been adapted from the book ‘Don't forget me, cobber!’ by Matt Anderson
Please note that all Australian schools received a copy of ‘Don’t forget me, cobber!’ as part of the 1997 Their Service - Our Heritage ANZAC kit. All Queensland schools were sent additional free copies of this book as part of the ANZAC Day Commemoration Committee of Queensland's 1998 ANZAC Education Pack.
The Western Front was the name the Germans gave to a series of trenches that ran 700 kilometres from the Belgian coast to the Swiss border. To imagine this, think of a ditch deep enough to stand in zigzagging its way alongside the Hume Highway from Melbourne to Canberra. As at Gallipoli, machine-gun fire caused terrible casualties on the Western Front. Both sides had dug trenches, sometimes only metres apart, as their only protection from the murderous gun fire. But they were never safe from the explosive artillery shells that rained down on the front line soldiers every few seconds for days at a time. The British High Command needed troops urgently. So after the Gallipoli veterans were rested in Egypt, and had been strengthened by the ‘fair dinkums’ from Australia, they were sent to France to fight Germany. But Gallipoli was not the last time the ANZACs fought the Turks. The Light Horsemen were sent to the Middle East where they took part in several battles, the most spectacular of which was the mounted charge at Beersheeba.
NOTE This symbol means that a detailed map is available. The maps have been prepared as Adobe Acrobat™ files, each ~200kb, and designed to print on two A4 pages.
Life in the trenches
When the ANZACs arrived at the Western Front, the first thing they saw were the lines of wounded soldiers being taken to the rear. As they got closer, they could feel the earth shake, and hear the constant “crump crump” of artillery shells. The sound was loud enough to make their ears ring, and became their companion for the next three years.
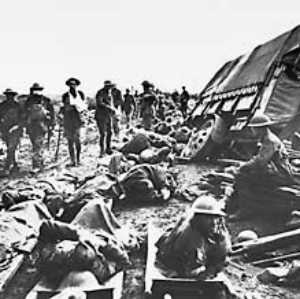
Like to copy this image? Please click here first
Casualty clearing station, Menin Road, Belgium (AWM E711)
Then they saw a series of muddy trenches littered with the waste of war. Boxes, cart wheels, wire and often the bodies of the dead and dying were strewn everywhere. These were the reserve trenches, far enough from the battle for soldiers to try to grab a little rest from all the madness in the front line.
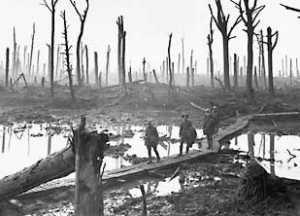
Like to copy this image? Please click here first
Diggers on a duckboard track, Chateau Wood, Ypres. (AWM E1220) ACROBAT MAP
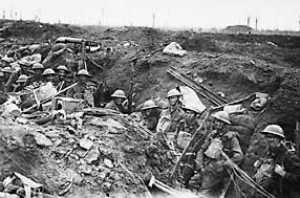
Like to copy this image? Please click here first
These were only some of the conditions the ANZACs had to endure – day after day after day. (AWM E862)
But the ANZACs were soon to realise that the Germans were not the only enemy. The winter of 1916 was one of the worst on record. Living in these trenches was to cause nearly as many casualties as the fighting. The ANZACs had only two blankets each and had to sleep as close as possible to one another just to survive.
Imagine a winter so cold that water was carried to the soldiers as blocks of ice. Think how cold it must have been to wake after a few hours sleep only to find your eyelids frozen shut. And imagine if you had to keep a bottle of ink in your pocket, otherwise the ink would freeze. Imagine your feet swelling to three times their normal size because you had been standing for a week in water up to your knees. And think how cold it must have been when ice formed around the rim of a boiling cup of tea after you had carried it only 20 paces.
The ANZACs’ first major battle in Europe was near a town called Fromelles (From-el) ACROBAT MAP. For many it was also their last. The men received orders to attack the third line of the Germans’ trenches. They marched across no-man’s-land and quickly captured the first trench. From here, they fought their way forward and successfully captured the second trench. Despite the intense fire, they leapt from the second trench and went looking for the third and final trench where they could finally seek shelter. But there was no third trench. Meanwhile, the Germans had fought their way back into the first and second trenches, and by now the ANZACs were out in the open. They dived into bomb craters and filled sand bags with mud, anything to protect them from the deadly machine-gun fire. Here they lay until night fell, when they slowly tried to crawl back past the German trenches to the Australian line. The British High Command did not allow the rescue of wounded men in the open, in case the rescuers themselves should become wounded. The Australians disobeyed. They could not leave their mates stranded and calling for help. One officer walked across the battlefield and made a truce with the Germans. He even offered himself as a prisoner while his men tried to find all the Australian wounded. In the 27 hours after the Australians first attacked the German trenches, 5533 ANZACs had been killed or wounded. This was twice as many casualties as the landing at Gallipoli.
“A place so terrible...”
A section of the Western Front called the Somme, named after the river flowing through the area, was described by one ANZAC in August 1916 as “a place so terrible that a raving lunatic could never have imagined it”. In the middle of the Somme was a township called Pozières (Pozzy-air) ACROBAT MAP, which was built on one of the few high points in the area. Whoever held the ridge could see everything the enemy was doing. The British had tried to capture Pozières, and in one day alone suffered 60,000 casualties. The ANZACs were chosen to relieve the British, and were ordered to continue the attacks.
The Australians launched seven bloody attacks on the German defences over a six-week period. They concentrated on two main strong points, Gibraltar and the Windmill.
On 4 August 1916, the ANZACs finally captured the ridge line and what little was left of the town.
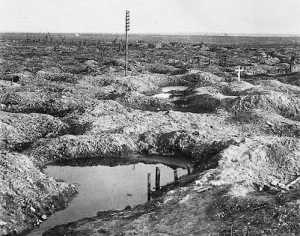
Like to copy this image? Please click here first
All that remained of Pozières Village after the ANZACs finally captured the town. (AWM E532)
One out of every two ANZACs who fought here at the Somme became a casualty. In all they lost more than 22,000 men. Through their determination and courage, and in the most dreadful conditions, the ANZACs had proven themselves capable of doing the impossible. Unfortunately this was not the last time the British High Command would expect the impossible from the ANZACs.
The Australians who fought in the First World War never forgot the experience. The war changed their lives. But it also changed the lives of the many French and Belgian civilians who lived in the towns the ANZACs fought to save. In fact, they promised never to forget the role the ANZACs played in gaining their freedom.
In 1917, the French village of Bullecourt (Bull-cor) ACROBAT MAP sat in the middle of the Hindenburg Line – a mass of barbed wire joining concrete block houses and trenches. In some places the wire was 100 metres thick, and no Army had yet been able to break through it.
On the night of 11 April 1917 the Australians attacked the Germans in Bullecourt. The ANZACs had no artillery, and the tanks that were supposed to break through the wire broke down or bogged in the snow-covered ground. Major Percy Black, who was leading part of the attack, called to his men: “Come on boys, bugger the tanks!” and charged towards the wire. His men leapt through with him, and fought their way into the German trenches. They were the first soldiers to break through the Hindenburg line. Proudly they looked for Major Black. But he lay dead on the wire.
“N’oublions jamais l’Australie” (never forget Australia)
So many ANZACs had been killed in the attack that only a handful of men were left alive to hold the trenches. The Germans realised this, and counter-attacked on three sides. Overwhelmed, the ANZACs were forced to withdraw. The only order given was to “fight it out like Australians”. The ANZACs returned three weeks later, and again captured the German trenches. For two weeks they survived vicious counter-attacks until the Germans finally gave in. When the smoke cleared from the battlefield, 10,000 Australians had been killed or wounded trying to save this small French village. In 1918, the Germans planned one final great offensive in an effort to win the war. At first the Allies were taken by surprise, and the Germans captured many towns and soon were within sight of the town of Amiens. The British High Command feared that if Amiens were captured, the war may be lost. The ANZACs were raced back from Belgium as ‘storm troops’ – special fighting soldiers who would be put into battle where they were needed most. At first, the ANZACs fought at Dernancourt (Dern-an-cor) ACROBAT MAP, a town on the road to Amiens, where 4000 Australians beat off an attack by 25,000 Germans.
Next the Germans attacked the French village of Villers-Bretonneux (Bret-on-er) ACROBAT MAP, after first using poisonous gas and artillery. When night fell, the ANZACs stormed from their trenches and counter-attacked. A British General, who himself had won a Victoria Cross for bravery, called the ANZACs’ attack “perhaps the greatest individual feat of the war”.
The ANZACs then had to enter the village and fight from house to house. Finally, Australian and French flags were raised over Villers-Bretonneux. The ANZACs stopped to bury their dead – 1200 Australians had been killed saving the village. It was not until they were putting the date on some makeshift crosses that they realised the date – it was ANZAC Day 1918, three years to the day since they had stormed ashore at Gallipoli.
The Australian flag is still flown at Villers-Bretonneux. It flies atop the Australian National Memorial, on which is listed the names of the 10,982 Australians killed in France who have no known grave. The French have called the main road through Villers-Bretonneux, Rue de Melbourne. The town has a restaurant called Restaurant le Kangarou, and the school, called Victoria College, was built from the donations of Victorian school children in the 1920s. Above every blackboard are the words “N’oublions jamais l’Australie” – never forget Australia.
Click here for a little more information about Villers-Bretonneux, including a picture of the War Memorial and cemetery
In May 1918, the ANZACs were finally commanded by one of their own. The officer chosen was General Sir John Monash. Monash had seen too many ANZACs killed, and was determined that the Australians were from now on were to be used properly.
In his first battle, at a place called le Hamel ACROBAT MAP, Monash used aircraft, tanks and artillery to soften the enemy before he sent in the ANZACs. He also rehearsed the attack time and time again. Monash had planned it to last 90 minutes. After 93 minutes, his men had taken 1500 prisoners, caused 2000 German casualties and captured nearly 180 machine guns. But perhaps his best attack took place at Mont St Quentin ACROBAT MAP, where the Germans held several thousand of their best men in reserve. The German General had decided that no one would be foolish enough to attack the hill, but just in case ordered his best-trained units to hold “to the death”. With less than a thousand men who had already been in combat for nearly three weeks, Monash planned his greatest attack. The ANZACs stormed the hill from three directions, and in two days had not only secured the hill, but had also captured 2500 prisoners. Victoria Crosses were awarded to another seven ANZACs for this action. It was to be the last great fight of their war.