


by Robert Lewis
Summary
The Battle of the Coral Sea was a series of naval engagements off the north-east coast of Australia between 4 and 8 May 1942. It was fought by Allied (United States and Australian) and Japanese aircraft against four different major groups of warships.
Some of the aircraft involved were land-based, but most were from the opposing aircraft carriers.
It was the first aircraft carrier battle ever fought, and the first naval battle in which the opposing forces of surface ships at no stage sighted or fired at each other. All attacks were carried out by aeroplanes.It is also the largest naval battle that has ever been fought off Australia’s shores.
The battle was significant for two main reasons:
- it was the first time in World War 2 that the Japanese experienced failure in a major operation; and
- the battle stopped the Japanese sea-borne invasion of Port Moresby.
For many people this was the ‘battle that saved Australia’. This is an exaggerated claim, but there is some validity to it. The battle certainly seemed more significant at the time than modern history books rate it.
Sixty years on it is easy to see the apparent inevitability of what actually happened. But we need to try and understand what it was like at the time, and to appreciate the great variety of factors that contributed to the outcome—including poor communications and intelligence creating uncertainty, variable weather conditions, the vulnerability and slowness of massive ships, the human weaknesses and strengths of crew and pilots, the limitations of technology and equipment, and the bravery or lack of it of the men involved.
Where was the Battle fought?
The battle took place in the Coral Sea, in an area separating the Solomon Islands, the eastern tip of New Guinea, and the north-eastern coast of Australia from Townsville to Horn Island. A map of this area appears as part of the battle description later.
This covers an area of many thousands of square kilometres, and for much of the time the opposing forces did not know where the enemy was. Each carrier group sent out planes to find the other, but the limited range of the planes, the limited skills of many of the air crews in ship identification, the often poor weather and the huge areas involved all made it very difficult for the planes to find their targets.
Who was involved?
There were basically four major groups of ships engaged in different parts of the fighting over the four-day period.
- There was a Japanese Port Moresby Invasion Group, with a Support Force (Marushige) and a Covering Group (Goto), that included the small aircraft carrier, Shoho and several cruisers.
- The Allied Task Force 44 consisted of a group of Allied warships, including the two Australian ships, the heavy cruiser HMAS Australia and the light cruiser HMAS Hobart. They were sent to find and attack the Port Moresby Invasion Group. This force was commanded by the Australian Rear-Admiral Crace.
- There was also a second Allied force of two aircraft carriers, the USS Lexington (commanded by Rear-Admiral Fitch) and the USS Yorktown (commanded by Rear-Admiral Fletcher), together with protective cruisers and destroyers. Their task was to stop the invasion, and to do this they would have to tackle the Japanese carriers accompanying and protecting it.
- The main target of the Allied carriers was the Japanese Carrier Striking Force, with the aircraft carriers Zuikaku and Shokaku, and protecting cruisers and destroyers, commanded by Admiral Takagi.
Generally, the larger the ship, the more guns it had, the heavier the armour for protection, the heavier it was, and the slower it became. The one exception was the carriers, which were large, but displaced relatively little water, because they were lightly armed - their role being to provide the launching pad for aircraft rather than to shoot at other ships. Hence, in battle, all other ships had to protect the vulnerable but essential aircraft carriers. They did this by forming a protective screen around the carrier.
A battle fleet
Warships at this time were:
- aircraft carriers
- battleships
- cruisers (heavy or light)
- destroyers.
The main variables between them were:
- their length
- their weight (measured by the amount of water they displaced)
- their armaments (the number and size of their guns)
- their speed.
In order of size they were:
- battleships
- carriers
- cruisers
- destroyers.
Why was a Battle fought in this place at this time?
The battle involved Allied forces trying to stop Japan’s continued expansion into and control of the Pacific Ocean area, which had been established between December 1941 and May 1942.
The Japanese Conquest of the Pacific December 1941- May 1942
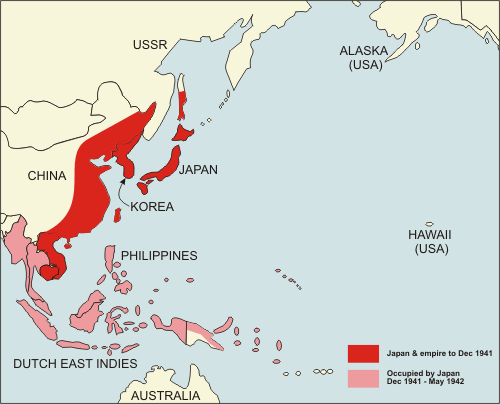
The Japanese plan to extend their Pacific control was to set up a base at Tulagi in the Solomons for long-range amphibious aircraft. At the same time they would take Port Moresby.
Control of the port and airfield at Port Moresby would mean that Japanese-held islands would be safe from land-based air attacks, and the Japanese Air Force would be free to attack Queensland ports and airfields at Horn Island, Cooktown, Coen and Townsville.
This would also cut sea links between Australia and the United States, stopping the movement of supplies and troops, effectively leaving the Japanese unable to be challenged in the Pacific area.
The Japanese would then launch a devastating attack on the main American fleet at Midway, between Pearl Harbour and Japan, destroying it and forcing America out of the Pacific War.
To achieve this the Japanese would first seize Tulagi in the Solomons. Transports carrying soldiers and escorted by the aircraft carrier Shoho and other warships, would then leave Rabaul, and head around the tip of New Guinea to Port Moresby. They would be protected by two other aircraft carriers, the Zuikaku and Shokaku, supported by cruisers and destroyers. The plan was for these Japanese carriers to intercept the American naval force from two sides as it entered the Coral Sea in response to the Japanese invasion.
The three Japanese aircraft carriers, with their protective ‘screens’ of warships, entered the Coral Sea early in May to support this invasion fleet. American intelligence knew that the Coral Sea action was about to happen – they had broken the Japanese secret naval codes, and were able to move ships into the area to oppose the enemy. But knowing what was happening, and then being strong enough to stop it, were two different things.
What was it like to be in the Battle?
A common image of naval battles is ships firing at each other. That did not happen in the Battle of the Coral Sea. The single most important element needed to understand that battle is the fact that warships were vulnerable to attacks by aeroplanes.
The basic plan of attack by both sides was that the enemy’s ships were to be destroyed by planes launching torpedoes or dropping bombs. These planes came from aircraft carriers.
So to defeat the enemy, you first had to destroy the runways that allowed the attacking aircraft to operate from the aircraft carriers. If planes could not be launched or could not land, they immediately became useless. Carriers could be sunk by aircraft zooming in low and dropping torpedoes, which would hole the ship at or under the waterline; or by dropping bombs, which would damage the ship, and hopefully ignite ammunition or fuel and seriously damage and eventually destroy the ship. These planes would also fire their machine guns at the target, hoping to cause further death and damage. Fighter planes would also be there to defend the attacking aircraft against other fighter planes launched from the carrier to defend it.
If the carriers could be destroyed, the other ships could be hunted down almost at leisure.
Each aircraft carrier had a ‘screen’ of other warships around it to protect it from air attack. The job of these surrounding ships was to shoot down attacking aircraft before they reached the carrier.
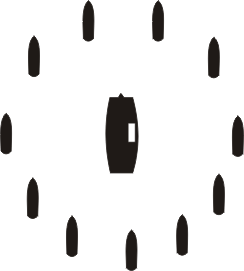
An aircraft carrier screen. The diagram shows the aircraft carrier USS Yorktown surrounded by a screen of cruisers and destroyers. The diameter of the "circle" is approximately 3.6 kms.
At the same time, the carrier would zig-zag at high speed to make itself a more difficult target. It would also launch fast and highly manoeuvrable fighter planes to attack the slower and more cumbersome attacking bombers.
So when you see newsreel footage or photographs of an attack, you are basically seeing:
- attacking fighter aircraft protecting the accompanying attacking bomber aircraft
- attacking bomber aircraft trying to get close to a carrier to launch torpedoes or drop bombs on it
- these aircraft continuing on to machine gun the target
- the protective screen of defending ships firing their guns to shoot down the attacking planes
- defending fighters also helping to attack the enemy aircraft and protect the carriers.
How the Battle unfolded
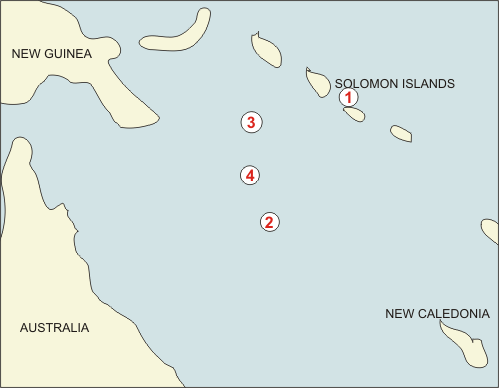
The Battle area. The numbered circles refer to locations mentioned in the text below.
4 May
The sequence of events started on 4 May. A coastwatcher had reported seeing a fleet heading for Tulagi. The Yorktown launched its planes to attack. They did some damage, but the main part of the invasion fleet was actually sailing from Rabaul towards Port Moresby. (See Battle map - action number 1) The American Commander assumed the Japanese carriers would be protecting the flank of these transports, and started to steam towards New Guinea. The main Japanese carrier fleet, however, had in fact hoped to catch the Americans from the rear, and were about to enter the Coral Sea near the Solomon Islands. The opposing forces now tried to find each other in the vast area.
5–6 May
The opposing forces continued to search for each other by sending out reconnaissance flights. They occasionally re-fuelled to keep their tanks topped up, so that they had sufficient fuel to last through a long engagement involving high speed and long distances if required.
7 May
There were no sightings of the Japanese invasion fleet until 7 May. Planes from the Japanese carriers Zuikaku and Shokaku found the American fuel ship, USS Neosho, and its escort, USS Sims, and attacked and disabled them, believing at first that the tanker was a carrier. (See Battle map - action number 2) Meanwhile, planes fromLexington and Yorktown found the Shoho, and destroyed it. This was the first time the Japanese had been beaten in an engagement. (See Battle map - action number 3)
Part of the Allied fleet, including the two Australian ships, was now sent towards Papua to wait for and attack the expected Port Moresby invasion fleet. Unknown to the Allies the main Japanese invasion fleet had turned back – they were too vulnerable to land-based bombers without the air support of the Shoho.
This left the Australian ships waiting to engage an invasion fleet that would never come. But this did not mean they were safe. At one stage HMAS Australia was attacked by Japanese torpedo planes and bombers from Rabaul. Skilful manoeuvring of the ships meant that little damage was done. A number of US bombers saw this, but thought that they were American planes attacking a Japanese carrier, and joined in! Fortunately, they did no damage, and soon realised what was happening.
Searching and fighting could only be carried out safely and effectively during daylight. The Japanese gambled on finding the US force first, and sent out their planes late in the afternoon. This was risky. If they found the enemy and attacked it, they might cause great damage, and be able to come back the next day and finish off an ‘easy’ target; but if they did not find the ships, they would have to land back on their own carriers at night, a difficult and dangerous manoeuvre.
(Masatake Okuyima and Jiro Horikoshi, in Richard Hough, The Longest Battle, Cassell & Co, London, 1986, page 166):
Our aircraft soon fell victim to the delusions and ‘mirages’ brought on by exhaustion. Several times the pilots, despairing of their position over the sea, ‘sighted’ a friendly aircraft carrier. Finally a carrier was sighted, and the remaining eighteen bombers switched on their signal and blinker lights as they swung into their approach and landing pattern. As the lead aircraft, with its flaps down and speed lowered, drifted toward the carrier deck to land, the pilot discovered the great ship ahead was an American carrier! Apparently the Americans also had erred in identification, for even as the bomber dropped near the carrier deck not a single enemy gun fired. The Japanese pilot frantically opened his throttle and at full speed swung away from the vessel, followed by his astonished men. Our aircrews were disgusted. They had flown for gruelling hours over the sea, bucked thunder squalls and, finally, had lost all trace of their positions relative to their own carriers. When finally they did sight the coveted American warship, cruising unsuspecting beneath eighteen bombers, they were without bombs or torpedoes.
Only eighteen out of the twenty-seven planes that had flown out that afternoon made it back. All the dead were veteran pilots, and could not be easily replaced by the Japanese.
8 May
On 8 May reconnaissance flights from both sets of carriers finally found each other simultaneously. Though 320 kilometres apart, they launched their planes to attack. The flights of warplanes passed each other, and some of the opposing pilots actually saw each other on their way to attack.
The main Battle
Each side now used all its weapons against the other. The attackers sent in their dive-bombers and torpedo-bombers, and were met by fighter planes and fire from the carriers and their screening ships. (See Battle map - action number 4)
There was great confusion during the battle, and there was great bravery – on both sides.
The Japanese spotter who located the American fleet on 8 May flew back and radioed in the details. Japanese fighters and bombers took off, but the spotter pilot was so anxious to make sure that they found their targets that he guided them back, despite knowing that he would not have enough fuel to return to his carrier and land. We can only presume that he crashed and died at sea.
During the attack on Shokaku an American aviator dived his plane to within only a few metres of the ship to ensure the bomb hit the target - even though he knew that his plane could not pull out of the dive. He crashed into the sea beside the ship, but his bomb landed right on target, and the Shokaku was doomed. These extracts from Australian, American and Japanese eye-witnesses involved in the conflict give some indication of the nature of the fighting that day.
(Ed Znosko, crewman on the USS Chicago, in Chris Coulthard-Clark, Action Stations Coral Sea, Allen &Unwin, Sydney, 1991 page 94):
I scrambled through the escape hatch to man my battle station as a stretcher-bearer in the after-battle dressing station . . . the 5-inch anti-aircraft guns could be heard in rapid fire, and the ship was shaking and vibrating from the full speed on our four large propellers and frequently changing course to dodge Japanese torpedoes.
(Jack Langrell, crewman aboard HMAS Australia, in Chris Coulthard-Clark, Action Stations Coral Sea, Allen & Unwin, Sydney, 1991 page 96):
All of a sudden all hell broke loose so I quite realised then this was definitely the Japs coming in. I turned around to go down the hatch I’d come up, only to find it was securely locked. I was caught on the upper deck, so I just stood behind the turret. One of the Japanese torpedo bombers would have been 100 feet from the ship’s side and level with the upper deck as it passed down the port side. Unbeknown to me they were spraying the ship with machine-gun bullets.
(Stanley Johnston, crewman aboard USS Lexington, in Chris Coulthard-Clark,Action Stations Coral Sea, Allen & Unwin, Sydney, 1991 page 118):
The forward . . . battery has the range on that first Jap. I see their shells, bright crimson tracers, tearing through the wings and fuselage. This plane wavers, begins a slow roll to its left and veers off just enough to pass in an inverted position just under our bow. As it glides by I see flames coming from the tail, and the machine smashes itself into the water 50 feet off our starboard bow. The port forward . . . battery . . . concentrates its fire on the second Jap. As this plane zooms to cross almost directly over these guns, they hit it squarely with a shell.
The explosion blows it to bits, its engine plunging into the water almost at the foot of the battery. Shreds of its wings and tail surfaces slither along the carrier’s deck like sheets of paper swept in front of a gale.
(Shigekazu Shimazaki, commander of Zuikaku, in Chris Coulthard-Clark, Action Stations Coral Sea, Allen &Unwin, Sydney, 1991 page 119):
When we attacked the enemy carriers we ran into a virtual wall of anti-aircraft fire; the carriers and their supporting ships blackened the sky with exploding shells and tracers. It seemed impossible that we could survive our bombing and torpedo runs through such incredible defences . . . I had to fly directly above the waves to escape the enemy shells and tracers. In fact, when I turned away from the enemy carrier, I was so low that I almost struck the bow of the ship, for I was flying below the level of the flight deck. I could see the crewmen of the ship staring at my plane as it rushed by.
(Mervyn Johnston, crewman aboard HMAS Australia, in Chris Coulthard-Clark,Action Stations Coral Sea, Allen & Unwin, Sydney, 1991, page 125):
We could hear . . . the comments of various pilots . . . [who] in some cases were running out of fuel or could not land on the ‘Lexington’ or the ‘Yorktown’ as they were either damaged or on fire. Many messages were goodbyes to friends or loved ones.
Hundreds of men died that day.
What was the outcome?
The US fleet suffered greater losses in the battle. US losses:
- One carrier destroyed, one damaged, one oiler and one destroyer sunk, 66 aircraft lost, and 543 men killed or wounded.
Japanese losses:
- One small carrier destroyed, one carrier severely damaged, one destroyer and three small naval ships sunk, 77 carrier aircraft lost, and 1074 men killed or wounded.
(Mitsuo Fuchido and Masataku Okumiya, Midway. The Battle That Doomed Japan, Hutchinson, 1957 pp 116-7.)
Why did the Battle turn out the way it did?
A large part of the outcome was due to Japanese complacency and failure of naval intelligence – they underestimated the strength of the forces available to the US, believing that it could only provide one carrier instead of two. Thus, they did not assign to the invasion the full strength that was available to them.
The Japanese also made tactical mistakes – they wasted valuable searching hours while attacking a relatively unimportant target, the tanker. They also lost the gamble involved in searching for their targets during the late afternoon, resulting in the loss of irreplaceable combat-experienced air crew.
The Americans had the advantages of knowing what the enemy were planning, due to being able to intercept and decode their secret signals. The Americans had radar that could identify incoming enemy aircraft in time for them to scramble their own fighters into the air to attack them.
The Americans also had luck during their attack – the two Japanese carriers were about twelve kilometres apart and one was covered in cloud, so the US pilots could concentrate on one, free from the protective guns of the other. They destroyed theShokaku. This meant also that the Shokaku’s planes, when they returned from attacking the US carriers, had to land on the Zuikaku; but that ship was unable to handle the number of planes arriving, and crew had to push landed planes overboard to allow more incoming ones to land. The Japanese lost 45 of the 72 aircraft operational at the outset of battle on 7 May.
The Allies sometimes needed that luck – as some of their weapons were decidedly inferior. The Devastator Torpedo Bomber, for example, had to fly low and slowly for a long period when coming in to release its torpedoes against the enemy, and in doing so became ‘sitting ducks’ for the gunners aboard the target ship. Then, even if the Devastators were able to release their torpedoes, they were likely not to stay on course, or if they did hit, not to explode!
The slowness of the Devastator also meant that the aircraft dropping bombs arrived at the target before them, and had to wait to carry out their attack formation of simultaneous high-level bombing and low-level torpedo strikes. The Japanese thus had time to disrupt the pattern and reduce its effectiveness.
In the longer term, however, the Allies gained far more from the engagement than did the Japanese.
The battle ended the proposed Japanese sea-borne invasion of Port Moresby. When they attacked the American fleet at Midway the next month, the weakened Japanese were met by a stronger Allied fleet than they had expected, and were defeated. This was the end of Japanese naval power in the Pacific.
Did the Battle of the Coral Sea save Australia from invasion?
In 1942 many people believed that Australia had been saved from invasion by the Battle of the Coral Sea. A speech at the time by Prime Minister John Curtin makes this clear.
(John Curtin in Chris Coulthard-Clark, Action Stations Coral Sea, Allen & Unwin, Sydney, 1991, page 129):
Events that are taking place today are of crucial importance to the whole conduct of the war in this theatre . . . I should add that at this moment nobody can tell what the result of the engagement may be. If it should go advantageously, we shall have cause for great gratitude and our position will then be somewhat clearer. But if we should not have the advantages from this battle for which we hope, all that confronts us is a sterner ordeal and a greater and grave responsibility. This battle will not decide the war; it will determine the immediate tactics which will be pursued by the Allied forces and by the common enemy.
In Australia, those who knew what was happening were ready for the worst.
(WAAAF radar operator, quoted in Chris Coulthard-Clark, Action Stations Coral Sea, Allen & Unwin, Sydney, 1991, page 130):
Coming from duty one bright moonlit night, I noticed something strange about the shapes of some of the [mangrove] trees. It was 1 am, but seeing a light in the Commanding Officer’s office, I knocked and asked, ‘Sir, why is there a soldier sitting in the branches of every third tree, and facing out to sea?’ He looked at me in the eye and said, ‘Corporal, there are no soldiers and if there are, you didn’t see them. And if you saw them, you certainly will not mention them to anyone else!’
Many modern historians now claim that there was no Japanese plan to invade Australia, therefore the Battle of the Coral Sea could not have stopped this invasion. There is truth in this, though in a complex way.
By early 1942 the Japanese had achieved their initial aim of having a defensible perimeter around their territorial gains.
A war plan of November 1941 identified areas to be rapidly occupied or destroyed as soon as the war situation permitted, and ‘important points in the Australian area’ were part of that.
But there was now disagreement between the Japanese Army and Navy leaders about what should be done next. The Army favoured continuing the offensive beyond New Britain, to include capturing Port Moresby, the Solomon Islands, the New Hebrides, New Caledonia, Fiji and Samoa. This would cut off communication and supplies between Australia and the United States, thereby isolating Australia and negating its potential as a supplier of fighting personnel and commodities, and a base from which resurgent American military might could be applied against Japan’s new possessions.
The Navy, however, advocated either a direct invasion of Australia, or a western advance against India and Ceylon.
Admiral Yamamoto had a third plan – to bring on a decisive naval confrontation against the United States as soon as possible, at Midway.
Yamamoto’s plan of an invasion of Australia would take far more ships and men that Japan had available, so this plan was abandoned in favour of the Army plan to isolate Australia, and effectively force it out of the war.
The Navy’s plan to force a confrontation at Midway went ahead in June 1942.Yorktown, which the Japanese had believed sunk at the Coral Sea, was able to take part at Midway, but the two Japanese carriers had not been repaired. The Coral Sea thus made some contribution to the outcome at Midway, where the Japanese Pacific fleet was virtually destroyed. This opened the way for the Allies to regain all the areas that had fallen to the Japanese in the Pacific, though only after several more years, and enormous losses.
How is the Battle of the Coral Sea remembered and commemorated in Australia?
Each year since 1946 Coral Sea Week has been celebrated in Australia with marches by service personnel from both Australia and the USA, and official functions for visiting American dignitaries. These celebrations express gratitude to the United States for its part in the battle, and the support given to Australia by America in World War 2.
More recently the commemorative emphasis has moved from the ‘Battle that saved Australia’ to the broader concept of the ‘Battle for Australia’, held on the first Wednesday in September. This now marks not only the Battle of the Coral Sea, but also the contribution and significance of all those who helped defend Australia at its most vulnerable time – the men on the Kokoda Track, the airmen in northern Australia and Papua, the sailors and merchant seamen keeping supply lines open, and the men and women in Australia in the services, as civilian workers, or volunteers on the home front.
Sources:
Richard Hough, The Longest Battle, The War at Sea 1939 - 1945, Cassell & Co, London, 1986.
S. L. Mayer (ed), The Japanese War Machine, Bison Books, Connecticut, 1976.
Chris Coulthard-Clark, Action Stations Coral Sea, Allen & Unwin, Sydney, 1991.
http://history.acusd.edu/gen/WW2Timeline/coral.htm
http://www.microworks.net/pacific/Battles/coral-sea.htm
http://www.navy.gov.au and click on Historical facts and Figures, Battle of the Coral Sea.