


At the outbreak of hostilities in 1914, the Australian Fleet comprised a battle cruiser, six light cruisers, six destroyers, two submarines — the AE1 and AE2 — and numerous support and ancillary craft.
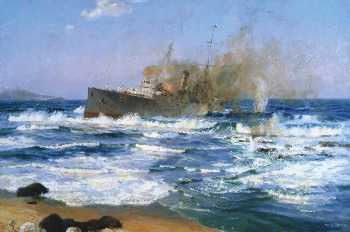
AWM ART00191. Arthur Burgess, Emden beached and done for, 9 November 1914, 1920, Painting: oil on canvas, 168.5 x254.5 cm. The German light cruiser SMS Emden, aground and on fire after battle with the RAN light cruiser HMAS Sydney off Cocos-Keeling Islands, HMAS Sydney is visible in the far distance.
The ships and men of the Royal Australian Navy operated as an integral part of the Royal Navy and served in all operational areas.
The Royal Australian Navy’s first task was to protect Australia’s ports, shipping and trade routes. As part of securing Australia’s maritime frontiers, the RAN took part in the first amphibious assault of the war when it played a major role in the capture of the German New Guinea colony in the Pacific. On 14 September, a day after the official German surrender of the colony, the AE1, commanded by Lieutenant Commander Thomas Besant and accompanied by HMAS Parramatta, left Blanche Bay, New Britain, to patrol off Cape Gazelle. She was last seen by Parramatta at 3.30 pm that day and no trace has been found of her, or her company, since. The fate of the AE1 was never established, but it is probable that the submarine was caught on a coral reef and sank with the loss of all on board.
After this operation, the ships of the RAN began the vital role of convoy escort. On 9 November 1914, whilst escorting a convoy near the Cocos Islands, the light cruiser HMAS Sydney was detached to investigate the sighting of a strange warship. This ship turned out to be the German light cruiser Emden. In the ensuing battle, Sydney destroyed the Emden and thus won the RAN’s first battle. The Sydney then served in the North Sea until the end of WW1, becoming the first ship to catapult a seaplane — on 8 December 1917.

Like to copy this image? Please click here first
AWM EN0470. November 1914.A group portrait of unidentified seamen on board HMAS Sydney. Ten minutes earlier, the cease fire had been given in her battle with the German cruiser Emden, which had run ashore onto a reef on North Direction Island in the Cocos (Keeling) Islands. The Sydney then pursued the collier Buresk—appropriated by the Germans—at full speed, and sent armed men aboard her. However, the German crew took steps to ensure that the collier sank. The crew were taken off.
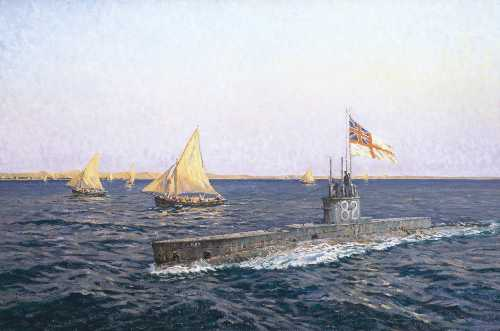
The Navy also played a supporting role in the Gallipoli campaign when HMAS AE2 became the first allied warship to penetrate the Dardanelles — an operation which made the AE2 famous. The submarine, commanded by Lieutenant Commander H. S. Stoker, was ordered to sail through the Dardanelles and disrupt Turkish shipping in the Sea of Marmara. No other submarine had yet managed to breach the Turkish defences, but in the early hours of 25 April 1915, the AE2 got past minefields and land-based guns, and after torpedoing a Turkish destroyer, it reached the Sea of Marmora. The AE2 remained at large for five more days before sustaining irreparable damage while under heavy fire. Stoker was forced to sink the submarine and surrender. All the crew survived and were taken prisoner, and together with Stoker, spent the next three and a half years as ‘guests’ of the Turks. Stoker escaped twice but was recaptured. He was awarded the Distinguished Service Order after the war.
Like to copy this image? Please click here first
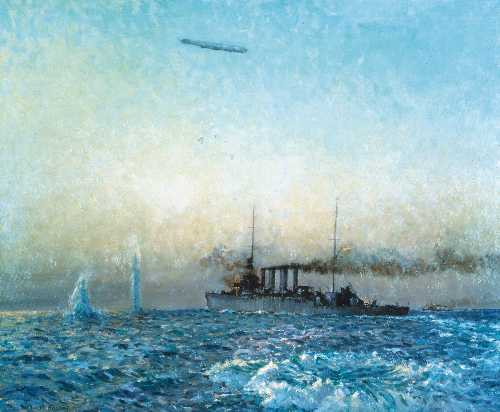
AWM ART12418. Charles Bryant, HMAS Sydney’s fight with a Zeppelin in the North Sea, c. 1931, Painting: oil on canvas, 102 x 127.4 cm. ‘HMAS Sydney’s fight with a Zeppelin in the North Sea‘ portrays an unusual action involving the Australian light cruiser Sydney which took place on 4 May 1917. Under Captain John Dumaresq the cruiser was leading a British ship, Dublin, and four destroyers on a sweep of channels south east of Rosyth, Scotland, between the Forth and Humber estuaries, when the force came under attack from the German naval Zeppelin L43. The five-engined airship was first sighted shortly before 10.30am, approaching the east at about the same time as Dumaresq discovered that several submarines were in his vicinity. By charging in the dirigible’s direction and opening fire with anti-aircraft guns at extreme range, the cruisers forced the airship to rise steeply and veer off. As soon as Dumaresq ordered his force to resume its original course, the L43 began stalking the ships. After failing to gain a bomb dropping position on the Dublin, the Zeppelin targeted one of the destroyers and managed to land three bombs within ten metres of it. The airship captain then turned his attention to Sydney which began evasive action. The duel continued for two hours, drawing to an inconclusive end only after the Zeppelin ran out of bombs at about 2.30pm. By then the cruisers had also expended all ammunition for their high altitude guns. Both sides reportedly parted on good terms. Sydney had become the first Royal Australian Navy vessel to be subjected to an air attack.
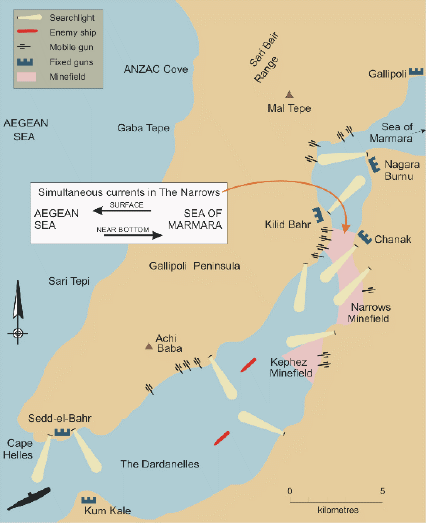
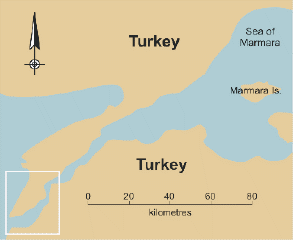
The daunting task facing the AE2, of travelling through to the Sea of Marmara, is reflected in this map of the Dardanelles Strait (left). The map below places the larger map in context.
On the Peninsula, the RAN Bridging Train provided vital service to the troops. The 1st Royal Australian Naval Bridging Train was sent to Gallipoli to prepare for the British landings at Suvla Bay in August 1915. The unit performed well under relentless shrapnel fire and remained at Suvla until the end of the campaign.
Having constructed the piers used during the British landing, the bridging train carried out maintenance duties; assisted with the landing of troops, stores, and ammunition; and finally assisted with the evacuation in December.
Like to copy this image? Please click here first
AWM ART09016. Charles Bryant, AE2 in the Sea of Marmara, April 1915, 1925, Painting: oil on canvas, 122.6 x 183 cm. British built E class RAN submarine AE2 operating in the Sea of Marmara after making a passage through the Dardanelles Strait to harass and attack Turkish shipping. It was the first Allied ship to pass through the Strait and reach the Sea of Marmara.
After Gallipoli, the Bridging Train moved to the Middle East, assisting with the Allied advance across the Sinai by landing stores on the Mediterranean coast, but was disbanded at the beginning of 1917.
The submarines AE1 and AE2 were the only losses suffered by the RAN during this conflict.
Like to copy this image? Please click here first
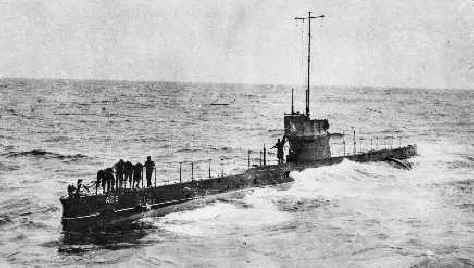
AWM A01939. Australian submarine AE2 escorting the troopship Berrima in the Indian Ocean. Some of the crew are on deck.
Like to copy this image? Please click here first
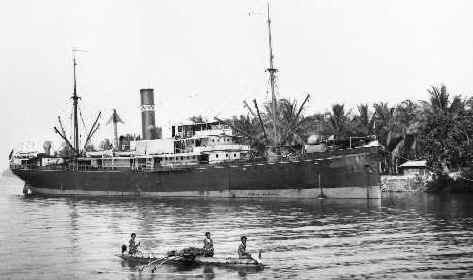
AWM J03109. The S.S. Matunga carried stores, fuel and personnel of the Australian Naval and Military Expeditionary Force (AN&MEF) to New Guinea until she was captured and sunk by the German raider Wolf. The crew were taken back to Germany for internment as prisoners of war.
The Merchant Navy in WW1
We should not overlook the contribution of the merchant seamen during the Great War.
In wartime, nations with extensive global interests involved in such confrontations look towards their merchant ships for sea lift capabilities in the transportation of their military personnel, equipment and supplies to wherever—and whenever—they are required; to sustain them for the duration with the necessary arms and ammunition, fuel and food and all the paraphernalia of war; and then bring everyone safely back home again.
We in Australia and New Zealand commemorate 25 April as ANZAC Day, setting aside the day to remember and to pay homage to our fallen comrades. This day was born out of the Gallipoli campaign, but how many people are aware of the involvement of the Merchant Navy in that campaign.
The merchant ships took all of our troops to Gallipoli, and in many cases landed our troops on the beach at ANZAC Cove in the ships’ lifeboats — manned by merchant seamen, who also came under the deadly fire from the Turkish guns.
It is also interesting to note that the great majority of wounded in that campaign were taken in the ships’ lifeboats — with merchant seamen manning the oars — to the hospital ships which were waiting offshore. The merchant ships evacuated most of our troops from Gallipoli to Alexandria, Lemnos and Cyprus and then transported the wounded home to Australia.
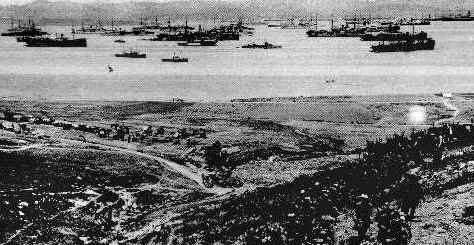
In the foreground, French troops training on Lemnos Island prior to the Gallipoli landing. In the background the troopships which transported the Allied forces lie at anchor in Mudros Harbour.
Text courtesy of the Royal Australian Navy History Unit and the Australian War Memorial.