


There are two memorials in Australia, a continent apart, that tell us something about the nature of the war in which Australia was involved in 1943.
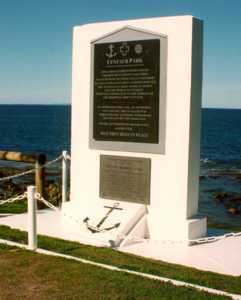
Centaur Memorial at Caloundra, Q. Photo courtesy Shirley and Trevor McIvor.
The memorial at Caloundra, near Brisbane, commemorates the sinking in May 1943 of the Australian Hospital Ship Centaur by a Japanese submarine. Two hundred and sixty-eight men and women died in that brutal attack.

Composite image of Z Special Unit Memorial, Garden Island, WA. Original photos courtesy Robert Lewis.
At Garden Island, near Perth, a memorial commemorates the dead of the men of the Services Reconnaissance Department, better known as Z Special Unit, a secret commando group. One of this group's operations was the daring and successful attack on shipping in Japanese-occupied Singapore Harbour in 1943 -- code named Operation Jaywick. The 14 men involved, posing as Japanese or Malayan sailors, managed to elude the ensuing search, and sail their little ship, the Krait, back to Australia without loss.
These memorials commemorate two contrasting events -- one involving openness, loss, tragedy, and a commitment to life; the other involving secrecy, triumph, victory, sudden death and destruction. They remind us of some of the elements of war in 1943, and tell us about some of the realities of the experiences of Australian men and women at that time.
The sinking of the Australian Hospital Ship Centaur
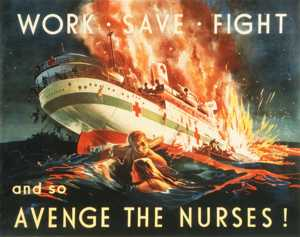
AHS Centaur was the Australian hospital ship sunk by a Japanese submarine in the early morning of 14 May 1943, with the death of 268 of its 332 crew, hospital staff and passengers.
Hospital ships were specifically created to bring back seriously wounded and ill soldiers from the battlefront to mainland hospitals. The Hague Convention of 1907 and the Geneva Convention of 1929 created this special category of protected ships during war. The aim was to try to impose some rules on the conduct of warfare that would protect the seriously wounded of all sides from further suffering and involvement in the war. The Conventions clearly stated that hospital ships were not to be considered legitimate targets during war, provided that they were clearly marked, were not carrying weapons, ammunition or combat-active soldiers, and were carrying only crew, medical personnel and wounded combatants. The Japanese were not signatories to these Conventions, but they had said that they would observe them during wartime.
Like to copy this image? Please click here first
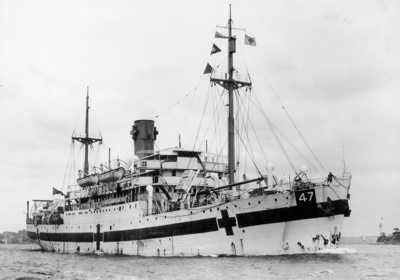
AWM P0444/214/081
This photograph of the Centaur clearly shows that the ship had the required markings -- four foot (1.3 metre) green bands on both sides from bow to stern, three large Red Crosses on the hull on both sides, two large Red Crosses on either side of the funnel lit by internal electric light, horizontal Red Cross on the navigation bridge and wheelhouse, the number (47) stencilled white on black on either side of the bow. The Japanese Government had been notified about the ship's status on 5 February 1943. At the time of the submarine attack on 14 May, the Centaur was fully lit and visible for many kilometres.
Was the Centaur carrying forbidden personnel or weapons?
The Centaur was loaded in Sydney on 10 May to sail to Cairns, and then on to Port Moresby in Papua to then bring back wounded from the battles of Buna, Gona and Sanananda.
But at the time, and since, there have been rumours and stories that it was loading in a way that was in breach of the Hague and Geneva Conventions -- and which would have made it a legitimate war target.
There was no problem with the crew of merchant seamen (civilians who signed up for six months at a time to run the ship), or the medical staff (doctors and orderlies from the Royal Australian Army Medical Corps, and nurses from the Australian Army Nursing Service). There was, however, some doubt about the loading of the members of the 2/12th Field Ambulance unit bound for New Guinea. A field ambulance unit's role was to provide front-line medical support to the fighting troops. They were non-combatants, but ambulance drivers could carry personal weapons to protect their vehicle and the wounded they were carrying in an emergency situation.
When this unit arrived at the dock to board, the ambulance drivers were carrying 52 rifles and 2000 rounds of ammunition -- personal weapons allowed for the protection of their ambulance vehicles. The captain of the ship questioned the legality of those weapons under the Conventions, but was satisfied that they were acceptable, provided that they were stored in the cargo hold for the trip. This was done. However, the rumours had started that the Centaur was carrying weapons and ammunition.
There were other rumours that commandos were aboard, that there were automatic weapons hidden on the ship, that spies could have learned of these 'breaches' and contacted Japan. An official inquiry cleared the Centaur of in any way breaching the Conventions with its personnel and cargo, but over the years a few survivors have claimed that these breaches existed. Most of these claims can be shown to be probably mistaken, but the existence of a secret file on the ship in the Australian Archives, not to be opened until 100 years after the sinking, has provided some fuel for this continued doubt and suspicion.
The sinking of the Centaur
The ship sailed on 12 May, and maintained radio silence, as was normal -- there were Japanese submarines active along the east coast of Australia, and dozens of ships had been attacked and sunk. This radio silence was later to lead to the survivors of the sinking being in the water in extreme danger and difficulty for a much longer period that would otherwise have been the case. The ship also sailed unescorted -- consistent with its status as a ship of mercy, and not part of an attacking naval situation.
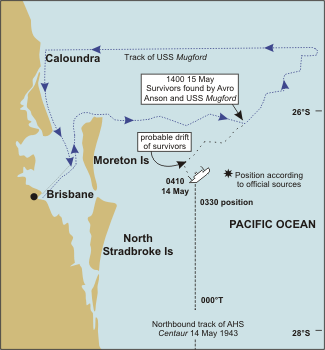
Map redrawn from a map published in ‘Australian Hospital Ship Centaur The Myth of Immunity’ by Christopher S. Milligan and John C.H. Foley.
At ten past four in the morning of Friday 14 May the Centaur had just passed Brisbane and was about 40 kilometres from shore, and opposite the southern tip of Moreton Island. A crewman was watching a school of porpoises that had joined the ship, playing in its wake, when he noticed a long thin line of foam heading towards the side of the ship. Seconds later the single torpedo struck the Centaur near the engine room, the upper and 'tween-decks (where a main hospital ward had been set up) and the main oil bunker tanks.
The bunkers exploded, sending a sheet of flame through the area. Men not killed instantly by the concussion wave of the first blast were incinerated moments later. Oil, debris and flooding sea water were soon everywhere. Many who survived the blast and the flame were killed by flying wreckage, or drowned as water rushed through the hold and the hospital ward.
Panicked people had to wake, grab their life jackets, and find their way up onto the deck, through bodies, water, wreckage and fire. In three minutes the ship sank.
Survivors have estimated that about 200 people were alive at this stage. Once on deck they found that the life boats and rafts were damaged or unable to be cut free quickly. Many who made it to the decks could not swim, and soon drowned. Others who made it into the water were sucked under as the ship sank. Many others were struck by flying debris, and knocked unconscious and drowned.
All were now covered in thick oil, and many had swallowed some -- creating a burning and choking effect. Survivors, many of them with broken limbs, severe burns or internal injuries, now desperately tried to find wreckage large enough to support them. Some who stayed in the water clinging to floating pieces of wreckage were now taken by sharks. And, to the horror of the survivors, the submarine now surfaced in the dark. They fell silent, and waited for the expected machine-gunning to start -- but the submarine soon submerged, to the great relief of the survivors. Then began the second stage of the horrific experience -- trying to survive in the ocean until rescue came. As the survivors clung to their supports sun, thirst, shock and hypothermia began to take their toll. The survivors hoped that, being so close to the Australian coast, they quickly would be rescued. In fact, circumstances had condemned them to a long ordeal.
The main problem was that the Centaur had been expected to maintain radio silence until it reached Cairns. Because the sinking had occurred so quickly, and because the radio mast had been damaged by the first explosion, there was no chance for a radio distress signal to be sent before the ship sank.
In addition, the ship had not been picked up by coastal radar operators -- a valve blew on the nearest radar station as the Centaur was entering range, and it sank before the problem was fixed. Nobody on duty was aware that the ship had entered the area. A soldier at a shore artillery battery saw the explosion far out to sea and reported it, but was told that it must have been a flare from a training exercise taking place further out to sea. And there was not even a suspicion that a submarine was in the area. A radar operator saw a blip that was undoubtedly the submarine, but at a range that normally was not picked up by radar, so the sighting was discounted as a technical aberration.
As a result, nobody was looking for the survivors. Several planes flew overhead, but did not see the people or the wreckage.
The survivors therefore had to try to cling to wreckage and life for 36 hours -- on overcrowded and unstable platforms, with little food and water, and with few medical supplies for those who were injured, some horribly so.
Like to copy this image? Please click here first
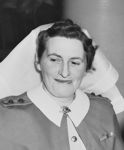
AWM 110228. Sister Ellen Savage.
There were many examples of self-sacrifice, mateship and bravery among the survivors. One of the most impressive was Sister Ellen Savage. She led a group in prayer, helped raise their morale, provided medical care to the injured (despite her own considerable injuries), and supervised the allocation and rationing of the meagre food and water supplies. She was awarded the George Medal for her actions.
Her deeds, and those of others, ensured the survival of many of those who had found wreckage to cling to after the sinking. They could not help all, however, and several men who had survived the sinking and were with their mates died before final rescue.
That rescue came when they were finally spotted by a plane, and the US naval ship Mugford cautiously steamed out to rescue the remaining 63 men and one woman.
The 332 people aboard the Centaur's last voyage had ranged in age from 15 to 67. Most were Australian, with some English, Scots, and individuals from Sweden, Iceland, Finland, Norway and Canada.
Among those aboard were at least eight sets of brothers, including one set of three -- all perished.
There were also the usual stories of good luck and bad luck -- people who should have been aboard but were not, and others who were not supposed to be on board that fateful voyage but joined the ship at the last minute.
When the last survivor had been rescued from the water and the final tally was done, there were only 64 people of the original 332 alive.
Group |
Dead |
Saved |
Total |
|---|---|---|---|
| Merchant crew (civilian sailors who signed on for six months at a time) | 45 | 30 | 75 |
| Ship's medical staff (Members of the Australian Army, males in the Medical Corps, females in the Nursing Service) | 44 | 20 | 64 |
| 2/12th Field Ambulance | 138 | 11 | 149 |
| Attached Australian Army Service Corps | 41 | 3 | 44 |
Why did the crew and the medical staff have the lowest rate of deaths? Largely it was because of the grim geography of death. The crew knew the ship well, and were quartered at the front and rear ends and below decks. Some were on duty, or had only recently come off duty and were not fully asleep. The medical staff were also either forward or aft, andon the lower decks. The Field Ambulance and attached Service Corps soldiers were mainly in the middle hospital ward area -- right where the torpedo hit.
Like to copy this image? Please click here first
AWM ARTV09088. WW2 poster.
Who sank the Centaur, and why?
The Australian Government protested to the Japanese about the atrocity. The Japanese denied it, and countered with accusations about Japanese hospital ships having been attacked by Allies. There was some truth in some of these accusations, but where the Allies had attacked they had either stopped as soon as they realised that the ships were hospital ships, or the markings on them were inadequate and not able to be seen from the attacking aircraft. However, in January 1943 a US submarine had sunk a Japanese troop transport carrying 9500 soldiers -- and then killed thousands of them in the water. In early March, US bombers had sunk a convoy of 22 ships, most of them troop transports. For the next seven days, boats and planes machine-gunned the survivors, killing more than 3000 men.
Prime Minister Curtin initially called on the Japanese Government to punish those responsible, but had to tone down his protest for fear that there might be retaliation against Australian prisoners of war who might in turn be accused of war crimes, however wrongly, by the Japanese.
Cartoon reproduced from a cartoon by Ian Gall published in ‘Australian Hospital Ship Centaur The Myth of Immunity’ by Christopher S. Milligan and John C.H. Foley. The cartoon depicts a Japanese Navy officer tearing into two pieces a document labelled "International Law". He sits on the shoulders of two 'caveman-like' men who are labelled "Ghoulishness" and "Barbarity" respectively.
Between 1944 and 1948 there were several investigations of the evidence about the sinking. These investigations were hampered by the loss or destruction of Japanese documents and the inability of several Japanese witnesses to be questioned.
However, the man who sank the Centaur has now been acknowledged in an official Japanese history of the war as Lt Cdr Hajime Nakagawa, captain of submarine I-177.
Nakagawa did not have an unblemished record before this attack. As a submarine commander early in the war he had sunk three ships -- unfortunately one of them was another Japanese submarine, in which 81 sailors lost their lives.
Was his attack on the Centaur justified, or was it an inexcusable war crime? The Japanese Army and to a lesser extent the Air Force were known for their disregard of the Conventions and prisoners of war, but the Navy had a much better reputation. If the Centaur had broken the Hague or Geneva Conventions by carrying prohibited personnel or armaments and the Japanese knew about this, then the Centaur was a legitimate war target. If it did not carry those prohibited people or armaments, or if it did but the Japanese did not know about it, then it must be considered a protected vessel. This is almost certainly the case.
Assuming that the Centaur was not a legitimate target, the question arises as to why the Japanese captain would have attacked it. A number of possible reasons have been offered over time:
- As the ship was heading towards the war and was not carrying wounded, it could be considered a legitimate target. This is not a tenable argument -- the hospital ships had immunity from attack at all times when they were correctly designated.
- He was following orders. A Japanese secret order to submarines of 20 March 1943 said: 'Do not stop with the sinking of enemy ships and cargoes; at the same time that you carry out the complete destruction of the crews of the enemy's ships, if possible, seize part of the crew and endeavour to secure information about the enemy.' However, this order should not have applied to protected hospital ships.
- He hated the enemy and did not care about The Hague and Geneva Conventions -- which seems a reasonable theory in the circumstances.
- He was determined to sink as many ships as possible for his own reputation -- although, if the Japanese Navy was largely committed to observing The Hague and Geneva Conventions then sinking a hospital ship would not have brought him any credit.
Perhaps the motivation of Nakagawa can be guessed at by his involvement in a series of sinkings of British ships in the Atlantic Ocean in the following year. In 1944, the submarine I-37, captained by Nakagawa, was involved in attacks on three British ships. Witnesses said he took the captain of the British Chivalry and forced him to watch as the submarine crew machine gunned lifeboats holding 52 survivors, killing all but eight. Nakagawa also ordered the killing of over one hundred other survivors -- by pistols, machine guns, sledge hammers and samurai swords. He was tried at the end of the war for these killings.
At the trial, much of the evidence against Nakagawa was disallowed, and he was eventually sentenced to eight years' hard labour. He was released in 1954 after six years' imprisonment. He died in 1968 at the age of 84, having never been tried for the sinking of the Centaur, and having refused to talk to researchers about it.
Where is the Centaur?
The site of the Centaur has never definitely been located. The best indication is from a survivor who was recording its position at the time of its sinking, and is shown on the map above. His evidence is supported by the location of the survivors, consistent with the pattern of currents for that time of year. It is almost certainly not where the plaque at Caloundra places it.
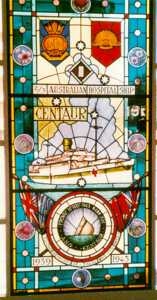
Portion of ‘Centaur’ Memorial window in Concord Repatriation Hospital, NSW. From an image originally supplied by Navy Photographic Unit.
The Centaur is a war grave, and was declared a protected historic site in 1990. It is believed to be at a depth that makes it inaccessible to conventional diving, but if it could be inspected it may contain evidence that could settle the rumours for all time.
The Centaur has many memorials in Australia -- including the plaque at Caloundra, a rose garden at Heidelberg Repatriation Hospital in Melbourne, in a memorial window at Concord Repatriation Hospital, and on a plaque at Brisbane's ANZAC Memorial. Centaurvictims are also named on many war memorials around Australia including the Australian Service Nurses National Memorial on ANZAC Parade in Canberra.
The Centaur has become particularly associated with nurses -- 11 of the 12 nurses on the staff of the hospital ship died in the sinking. However, it should not be forgotten that all but one of the 18 doctors aboard also died, and that most of the dead were Field Ambulance men whose job was to face the enemy not as armed soldiers, but in a way that often exposed them to the enemy while they tried to save lives. Perhaps that is the true message of the story of the Centaur -- that one important aspect of the Australian experience of war is the self-sacrifice and mateship that we pride ourselves on as part of the ANZAC tradition, and the Australian character.
‘Centaur’ Memorial, Coolangatta, Q. Photo courtesy Shirley and Trevor McIvor.
The MV Krait and Operation Jaywick
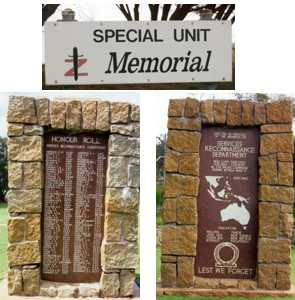
The second memorial mentioned at the start of this article, the one at Garden Island at Rockingham, near Perth, is at first glance a strange one. It lists dozens of names from a variety of places and services. There are men from the Navy, Army and Air Force. There are civilians. There are people from Britain, New Zealand and Portugal. And there is the strange name binding them -- the Services Reconnaissance Department, better known as Z Special Unit.
Z Special Unit
Z Special Unit was a top secret unit formed in 1942 as a special operations group to gather intelligence and carry out sabotage right at the heart of the enemy. Its members were sworn to secrecy about their operations, and were highly trained as silent and effective killers.
Their first mission was to be Operation Scorpion -- infiltration of the Japanese-controlled port at Rabaul in New Britain. They trained for this with a secret and silent raid on Townsville Harbour, where they attached dummy mines to numerous ships. The next morning the authorities were furious to discover the 'mines', and to realise how vulnerable they were to a covert attack.
Operation Jaywick
A change in the war situation led to the abandonment of the plan to infiltrate Rabaul Harbour, and the focus switched to Singapore. Code named Operation Jaywick, the aim of the raid was for a group of Australian and British Z Special Unit operatives to sneak into Singapore Harbour, and attach time-delayed limpet mines to as many ships as possible. The raiders would try to escape before the ships exploded. Singapore was a particularly poignant choice -- thousands of Australian and other Allied soldiers and nurses were being help prisoner of war there, and several of the men chosen for the raid had escaped from there when Singapore fell to the Japanese Forces on 15 February 1942. One man's wife was a prisoner of the Japanese there, while several also had relatives and mates in the Changi prison compound. They would be so close to their loved ones, yet unable to help them directly.
The Krait
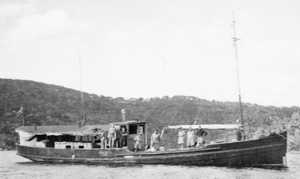
How to approach the port unseen? The key would be the small ship, the Krait. This was a former Japanese fishing boat, named the Kofuku Maru, that had been seized and used to transport many refugees during the fall of Singapore. It was later sailed to India, where it was re-named after a deadly Indian snake, the Krait. The little boat was a bit over 20 metres long, less than three metres wide, with a top speed of six-and-a-half knots, and a range of 13000 kilometres. As an authentic ship from the Singapore area it would not arouse suspicion.
Like to copy this image? Please click here first
AWM 067338. MV ‘Krait’, length 70 foot, diesel-engined, speed six and a half knots, range 8000 miles. Formerly the property of a Japanese fishing firm in Singapore.
The Krait was stocked with necessary supplies -- sealed tins of food and fresh water for four months, medical stores (including cyanide suicide pills for each man), 50000 cigarettes for barter or bribes of locals, £200 (equivalent to many thousands of dollars today) in Dutch guilders, arms, ammunition and explosives, and the dismantled canoes that would be re-assembled for the raid. Care was taken to make sure as many of the goods as possible were Japanese-made -- sunglasses, for example, which might be recognised at a distance, pencils, paper, cooking pots, even toothbrushes. If any of these fell overboard they would not indicate anything suspicious.
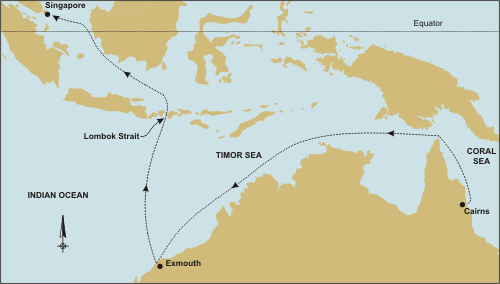
The epic journey of MV ‘Krait’.
On 8 August 1943 the Krait set out on the 4000 kilometre trip from Cairns in Queensland to Exmouth Gulf in Western Australia. The crew of 14 ranged in age from 20 to 43, with most in their twenties. They included four soldiers and ten sailors -- two Englishmen, a Welsh coalminer, a Northern Irishman, and ten Australians -- from every State except Tasmania. None spoke Japanese.
At Exmouth Gulf they took delivery of four special collapsible canoes flown out from England. These were equipped with small masts and black silk sails. They were six metres long and less than a metre wide. They were finely tapered at both ends, with hulls of seven-ply rubber and canvas -- almost impossible to hole -- which pulled on to fit like skins. The covering included top decking except for three manholes, two of which were used for paddling, the other for supplies. Each manhole had a flexible waterproof covering with an elastic aperture which fitted the paddler's waist.
They set out from Exmouth on 2 September, heading towards Singapore through enemy-controlled waters. They flew a Japanese flag as part of their disguise. The crew stained their bodies brown, dyed their hair, and dressed in sarongs so that they would appear to any casual observer to be Malays or Japanese. None could speak the language, so the risk was that if any Japanese warship became curious and decided to take a close look the crew would have had to fight to the death.
Once in Japanese waters, they took extraordinary care that there would only ever be one or two men on deck, and that no rubbish of any sort -- even a match -- would be thrown overboard. They were aware that any trail of suspicions rubbish might indicate that they were in the area.
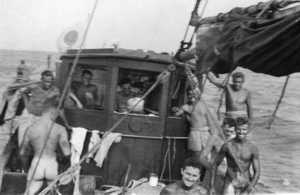
Like to copy this image? Please click here first
AWM 067336. Singapore, Straits Settlements, September 1943. Members of Operation Jaywick, Z Special Unit, on board the MV Krait en route for Japanese occupied Singapore.
On 18 September the Krait slipped into one of the small, heavily-vegetated islands near Singapore Harbour, and unloaded the three teams of canoeists and their equipment. The Krait would then chug around the area, trying to be inconspicuous, until rendezvousing with the saboteurs on the night of 1 October, 100 kilometres from Singapore. This gave the commandos 12 days to get to Singapore Harbour, sink as much shipping as they could, hide out until the expected furious search for them had eased, and get back to the Krait.
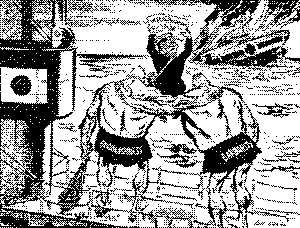
On 20 September three two-man teams loaded their equipment into the special canoes. Their task now was to move to a special hiding place, then select the best time to paddle silently through the night into Singapore Harbour, select their targets, attach the limpet mines, and escape to hide on another island until they could steal back to the waiting Krait.
Each man wore a black two-piece suit of japara silk over a khaki shirt, two pairs of black cotton socks, and black sandshoes with reinforced soles. Each wore a black webbing belt holding a .38 revolver and 100 rounds, a sheath knife, a short loaded rubber hose (as a cosh), a small compass, and a first-aid kit. Each also carried his cyanide capsule -- to take effect five seconds after being eaten. Each canoe carried 300 kilograms of equipment, including food and water for a week.
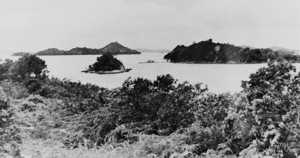
Like to copy this image? Please click here first
AWM 300921. Subar Island, Netherlands East Indies, September 1943. From this point the canoe parties of Operation Jaywick departed for Singapore Harbour.
The crews crept forward to their final staging point on an island about 12 kilometres from Singapore. They could see the city lights. They set out near midnight the following day, but were caught in a strong current that stopped any progress, and they returned to their hiding place. Throughout the next day the weather and tides made the assault impossible.
The night of 26 September was their final chance to carry out their mission and return in time to meet the Krait as agreed. The three two-man crews silently glided into the Harbour at different points, and quietly selected their targets. After the physically arduous task of paddling into the harbour, their nerves were now strained by the closeness of the enemy -- one noise in attaching the mines could have led to a curious sailor raising the alarm. Even if one person aboard a ship had idly looked over a railing or through a porthole in the right direction, the saboteurs could have been seen -- which would have led to the failure of the mission, and their capture and certain death. Fortunately their training and luck held, and nobody saw them in the shadows of the hulls of the target ships.
The crews then silently paddled out of the harbour towards their chosen hiding spot, and, despite the exhaustion and tension of more than 80 kilometres of paddling in enemy waters, listened to hear the roar of their mines destroying the enemy ships early the next morning.
As they slipped into their swampy hiding place, the explosions came, nine of them, and the harbour erupted into uproar. Japanese planes and ships started searching for the saboteurs, but the Z Force men stayed hidden until they could move out secretly to rendezvous with the Krait -- after another 90 kilometres of paddling. Once having finally boarded the Krait they now had to travel out of the enemy waters, this time with the enemy much more likely to be alert and suspicious.
There was one very dangerous moment, however. One night, still deep inside enemy waters, a Japanese warship on patrol came right up to them and travelled alongside them for a distance, yet did not challenge them. Why not? The men later speculated on the reason -- was it because their disguise was so good? Or, more likely, that they had caught a tired officer at the end of his watch, and challenging the apparently innocent boat would have meant that he was delayed in going off duty for a rest?
Whatever the reason, their luck held on that night, and the Krait passed unchallenged out of enemy waters. On 13 October the Krait had cleared Lombok Strait, and was heading back towards Exmouth. Lyon finally broke radio silence, and signalled the success of the mission. There was no reply, however, so the Krait re-imposed its radio silence until two days later, when the re-sent signal received a reply. The authorities now knew that they were on their way back, and would be able to protect them. On 19 October the Krait anchored off the American base of Potshot in Exmouth Gulf. It had been 48 days and 8000 kilometres since the Krait had headed north to Singapore -- and 33 of those days had been spent deep inside enemy waters.

Like to copy this image? Please click here first
AWM P00365.004. Ambon, 1945. MV Krait alongside the wharf. An AIF Guard of Honour is awaiting the arrival of General Blamey to take the official surrender of the Japanese in the area.
The raid was a great success -- both in physical destruction or severe damage to seven vessels representing nearly 40000 tonnes of Japanese shipping; and also psychologically for the raiders, and for the Allied POWs in Changi.
All 14 raiders returned home safely, though six were in a group chosen to try and repeat the raid in the 1944 Operation Rimau, when every one of the 23 men on that raid was killed or captured and executed. Most of these men are buried at Kranji War Cemetery in Singapore, but every one of them is now commemorated in the names of the streets of Exmouth.
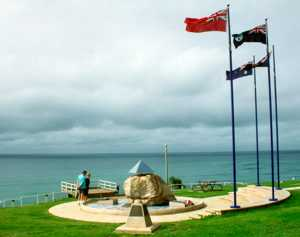
Urangan, Qld. The memorial to the men of the Z Special Unit. The men of Operation Jaywick and some of the other Z and M special operatives were trained on nearby Fraser Island. Photos courtesy Shirley and Trevor McIvor.
The Operation Jaywick crew was:
Lieutenant Colonel I. Lyon (GH)*
Lieutenant Commander D. Davidson (RNVR)*
Captain R. Page (AIF)**
Lieutenant H. Carse (RANVR)
Leading Stoker J. McDowell (RNR)
Leading Telegraphist H. Young (RANR)
Acting Leading Seaman K. Cain (RANR)
Able Seaman W. Falls, (RANVR)**
Able Seaman A.W.G. Huston DSM (RANVR)*
Able Seaman A. Jones (RANVR)
Acting Able Seaman F. Marsh (RANVR)*
Acting Able Seaman M. Berryman (RANVR)
Corporal R. Morris (RAMC)
Corporal A. Crilley (AIF)
- Killed in action or died on Operation Rimau
** Captured and beheaded by Japanese on Operation Rimau
(AIF) Australian Imperial Force
(GH) The Gordon Highlanders
(RAMC) Royal Army Medical Corps
(RANR) Royal Australian Naval Reserve
(RANVR) Royal Australian Naval Volunteer Reserve
(RNR) Royal Naval Reserve
(RNVR) Royal Naval Volunteer Reserve
At the end of the war the Krait was used to carry timber on Borneo rivers until it was bought as a war memorial and returned to Australia in 1964. The Krait is now permanently moored in Sydney Harbour, part of the National Maritime Museum collection at Darling Harbour.
Sources:
Ronald McKie, The Heroes, Angus and Robertson, Sydney, 1960.
Peter Thompson and Robert Macklin, Kill The Tiger, Hodder, Sydney, 2002.
Christopher S. Milligan and John C.H. Foley, Australian Hospital Ship Centaur The Myth of Immunity, Nairana Publications, Hendra, 1993.