


by David Hobson
Cowra is a town which hides an eventful wartime past in the peaceful tranquillity of its famous Japanese Gardens. The site of the infamous ‘Cowra Breakout’, the town has gradually healed the gaping wounds of its World War 2 role. Situated three hundred and thirty kilometres south-west of Sydney, the Cowra of the 1940s was a typical middle-sized Australian town, with a population of around three thousand people. At that time, Cowra was the site of a major prisoner of war camp which held mostly Japanese and Italian prisoners. The majority of the Italians had been captured in the Middle East, while the Japanese had been fighting in and around the islands immediately north of Australia.
The prisoner of war camp was huge, covering an area of over thirty hectares. It was almost circular in shape and divided into four separate compounds by two, seven-hundred-metre long thoroughfares, known respectively as ‘No Man’s Land’ (which ran approximately east-west) and ‘Broadway’. Broadway, so called because of its bright lights at night, was used as an access road, as it ran in a north-south direction.

Like to copy this image? Please click here first
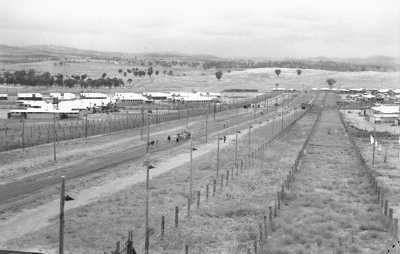
AWM 064284. Looking west showing compounds of the Cowra prisoner of war camp with the group headquarter buildings in the foreground.
Approximately half the prisoners in the camp were Italians, who occupied A and C compounds, while D compound housed Japanese officers, Korean and Formosan prisoners. B compound contained Japanese non-commissioned officers and junior ranks. It was from within the confines of this compound that the breakout erupted.
Like to copy this image? Please click here first
AWM 064347. A general view of the race between the four compounds of the Cowra prisoner of war camp. “B” and “C” compounds are on the left while “A” and “D” compounds are on the right.
The Italians had fought tenaciously during the war, but finally had been forced to surrender. Like the soldiers of most armies they saw no lasting disgrace in their surrender, but accepted it as a necessary part of the fortunes of war. They were aware of their rights under the Geneva C onvention, and were content to see out the war as prisoners on foreign soil.
The Japanese, however, found the act of surrendering a deeply humiliating experience. Many adopted false names when they were captured so that their brothers-in-arms and families would presume them dead. The Australian guards were aware of the deep-seated unhappiness of the Japanese in B compound, but held no fears of an outbreak. The camp adhered very closely to the Geneva Convention and the guards treated their prisoners well. Furthermore, they believed that it was clear to the inmates themselves that any attempt at escape would be suicidal, and was therefore unlikely. The prisoners had no real weapons and no means to obtain arms. Furthermore, any attempted escape would involve negotiating the three barbed wire perimeter fences and metres of entangled barbed wire, which lay between them. The camp perimeter was dominated by six guard towers, each about nine metres high, and regularly patrolled by armed guards.
This sense of security changed in June 1944 after a Korean prisoner leaked information about a mass breakout. By this time, the camp was becoming overcrowded, and nervous Army officials in Sydney took the leak seriously. Two Vickers machine guns, extra Owen and Bren guns, rifles and ammunition were obtained. In addition, a sentry team was permanently positioned in the centre of Broadway at night. There was, however, no increase in the number of guards (due to the risk of crossfire), nor in the number of hut searches.
Escape Plans
Although some loose signs of an escape existed, the Japanese made no firm plans for a mass breakout until early August. In fact, the plans were made only after camp officials began to separate the B compound inmates by relocating the junior ranks to a camp at Hay in western New South Wales.
On the 4th of August, shortly after being informed of the prisoner transfer, the Japanese commander of B compound, Sergeant Major Kanazawa, called a meeting of the twenty hut leaders. They were told to explain the transfer situation to their men and, by ballot, gauge the level of support for a mass outbreak.
In an atmosphere of harried debate and strong argument, a decision was reached, but it was far from unanimous and, at times, misrepresented by the hut leaders. The decision was final, however: the compound would launch a mass escape.
Under the terms of the escape plan, the prisoners of war agreed that injured and incapacitated prisoners could restore their honour by committing suicide prior to the escape and that no civilian would be harmed. The escape would commence with a bugle blast at 2.00 am the following morning, when the huts would be set alight.
Armed with their rudimentary weapons of filed-down cutlery and baseball bats, and protected against the barbed wire by baseball mitts and blankets, the prisoners planned to ‘hit’ the wire in four groups. Two groups would scale the outer three fences and negotiate the ten metres of entangled and concertina barbed wire which lay there. The other two groups would break into Broadway. One of these would attempt to link up with the Japanese officers in D compound, while the other would attack the outer gates and the Australian garrison, which lay beyond.
The Escape
Shaken from their sleep by a conflagration of burning huts and the high pitched shrieks of almost a thousand Japanese prisoners of war, the Australian garrison rushed into action. Darkness soon enveloped the scene as a stray bullet severed the main electricity line. Within minutes, Privates Benjamin Hardy and Ralph Jones had manned the No. 2 Vickers machine-gun and were firing into the first wave of escapees, but they were soon overwhelmed by the sheer weight of numbers and killed. In an act of incredible presence of mind, Private Jones removed and concealed the lock – the most crucial component of the gun. This action rendered the gun useless, thereby preventing the Japanese from taking command of the camp.

Like to copy this image? Please click here first
AWM 073486. Knives recovered in and around B camp. (The Japanese section), of Cowra prisoner of war compound after the mass escape attempt in the early morning hours of the 5 August 1944.
Like to copy this image? Please click here first
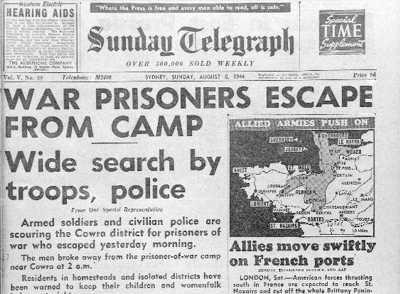
AWM 044570. Headlines reporting the breakout of Japanese prisoners of war at Cowra.
The other three waves of escapees broke through the fences. The two groups in Broadway came immediately under Australian fire from both ends and were pinned down for several hours. The attempt to link up with the officers in D Compound failed. By contrast, almost all of the Japanese who crossed the perimeter wire outside B Compound escaped to freedom. Three hundred and thirty were on the loose. It took nine days to fully recover them, with some travelling as far as Eugowra, a distance of over fifty kilometres.
Like to copy this image? Please click here first
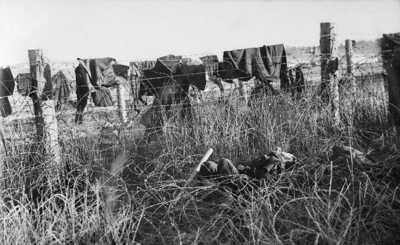
AWM 044172. The morning after the outbreak revealed dead bodies lying everywhere along the blanket-draped wire.
Like to copy this image? Please click here first
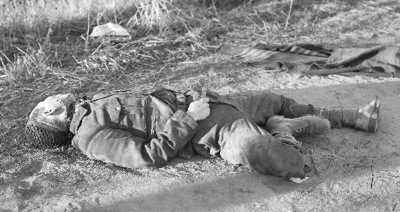
AWM P02567.006. The dead body of a Japanese POW who committed suicide by cutting his throat with a knife during the mass escape from the camp.
The Roundup
The Royal Australian Air Force, police, Australian Military Force trainees and members of the Australian Women’s Battalion stationed at Cowra all assisted with the roundup operations. Many escapees chose to take their own lives rather than be recaptured. Two threw themselves under an oncoming train, while many hanged themselves. On their recapture, some pleaded to be shot. Others surrendered peacefully. At least two prisoners were shot by local civilians and several by military personnel.
Lieutenant Harry Doncaster became the only Australian killed in the roundup, when he was attacked and murdered by Japanese eleven kilometres north of Cowra. In total, two hundred and thirty one Japanese soldiers and officers were killed. One Japanese officer and one hundred and seven other Japanese soldiers were wounded. Four Australians had died, including Private Shepherd, who was slain during the breakout in an area near the top end of Broadway. Four others were injured. The leaders of the breakout had ordered that no civilians be harmed, and they were true to their word.
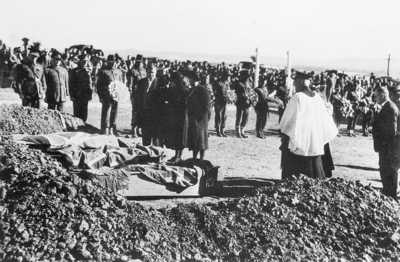
Like to copy this image? Please click here first
AWM 044119. Cowra, NSW. August 1944. Burial of Australian soldiers killed during breakout of Japanese prisoners at Camp 12B, Cowra POW and Internment Group Compound.
Postwar Reconciliation
Following World War 2, the camp was dismantled and the last prisoners of war expatriated to their respective homelands. While the events of the Cowra Breakout and the experiences of Australian prisoners of war have left uneasy feelings for many, the sixty years since the breakout have seen Cowra develop into a ‘Centre of World Friendship’. The town’s residents boast a very positive relationship with their old enemies, the Japanese. Those Japanese and Australians who died on Australian territory lie peacefully in the Cowra War Cemetery, which was opened in 1963, under the care of the local authorities. In 1979, Cowra’s beautiful and scenic Japanese Gardens were established, signalling the strengthening relationship between Japan and Cowra. Recently, Cowra was honoured with the gift of a bronze Peace Bell, one of only seven worldwide and the only one in Australia. This rare gift was made as a tribute to the spirit of friendship and peace which has developed between the Japanese and the Cowra community.
Visitors to Cowra today can view the relic foundations of the prisoner of war campsite and traverse the avenue of cherry blossom trees, which links the Cowra War Cemetery and Japanese Gardens to the site. It is a tribute to the depth of cross-cultural goodwill that the flower of international friendship has bloomed from such tragic origins.
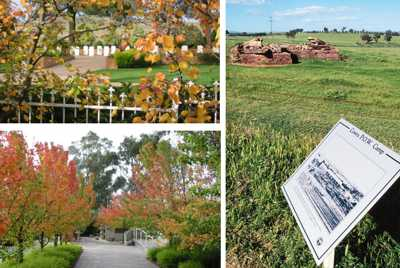
Left, the Cowra War Cemetery and Right, the relic foundations of the POW camp. (Photographs courtesy Cowra Shire Council.)